
That said, I've seen instructions online to make a "light box" out of cardboard and paper. The idea is to make a mini-studio to evenly light the small object in question and give a nice even light and background. I finally decided to give it a try- especially since I launched a new food blog this week, and I really want to improve my food photography on the dedicated blog.

I started with a box. This is the box incidentally, our new laptop came in this week. I was told I was allowed to use it provided I cut off the UPC so my husband could send the rebate in. Once I had the box, I had to cut holes in the sides for the light to come in. I really should have used a utility knife, but the scissors were handier, so I started (and finished) with those, but it wasn't easy. I really should have went to find the utility knife.

Anyway, Then I was left with a box-with-holes. I went to find some appropriate paper to cover the holes, to evenly diffuse the light on the way into the box, making for a nice, even light on the object in the center of the box. A posterboard provides the background for the picture, curved along the back, to avoid a harsh corner or shadow. The posterboard also reflects light up, helping with the even lighting.

I'll admit, what resulted wasn't pretty. I didn't really have the right materials, but I wanted to give it a first-try, and I did. I wasn't really going for 'pretty' I was going for 'utilitarian'. And, when I stuck the first thing I saw in the box to see if it worked, I was pleased.
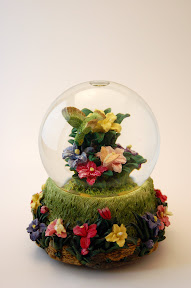
This is a snowglobe/musicbox from Josh, given to me early on when we were dating.

This is my "Make It From Scratch" carnival picture :) and the next picture gives you an idea of how the box works:
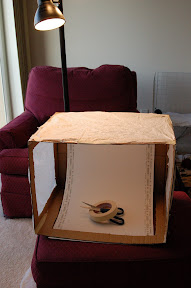
It really should have more light around it. I could probably go find another spotlight/desklamp to make it even brighter. Ideally, it woudl have an external flash next to the side, but I haven't invested in one of those yet. I'm still learning.
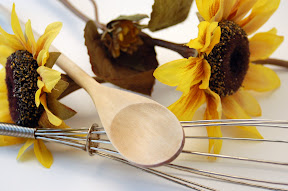
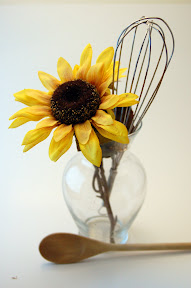
In the end, I started taking pictures for my new blog's banner. The new blog is called Sunflowers in my Kitchen (Did I mention I love sunflowers?) Which of these do you like best? Or do you have other ideas?

I look forward to doing cool food and other photography in the future in this box, and maybe making it a bit sturdier as well. Other variations include using different colored posterboard for backgrounds, or covering up a side of the box to get light to come from only one direction. All in all, a pretty cool project. I'm pleased. I was determined to not cook something for this week's Make It From Scratch, and I succeeded!
7 comments:
I have sunflowers in my kitchen too!
This project is so cool. I've not been happy with my food pictures either, but I didn't know it would be so easy to fix! Thanks for posting this!
BTW I like the bottom picture!
That's great. The pics are lovely. I like the third one best. What if you just removed the spoon from the horizontal plane?
Those homemade light boxes are great. I made one too for my ebay stuff, although I no longer ebay. They really do make a difference with the quality of the picture.
I vote for the first picture! Great job!
I like the first one the best. This is an awesome post! I will be making one of these, too. Congrats on your food blog, I launched a new one this week, too! Great minds think alike!
looks just like my light box. it works great and was cheap.
Isn't this the one that didn't survive the move? Too bad. :-/ It was cool.
Post a Comment