
The Rule of Thirds - This is the first thing I learned as a photographer. Pictures are more interesting when the subject or the horizon isn't cutting the picture in half (or the horizon isn't cutting the subject in half!). Imagine a tic-tac-toe board on your viewfinder, and put your subject at an intersection of two of the lines. See the pictures below, and notice how the portrait with my sister off-center is more interesting.
A:
 B:
B:
Background Distractions - There are a couple things to watch for here. Simple backgrounds are best (C). See that nothing in the background is interacting with the foreground in an odd way (See my mistake in photo D- a tree is growing out of my sister's head!) Busy backgrounds detract from the subject and distract the viewer from the subject (E). Sometimes just getting in closer or shifting the angle of the picture can change the background entirely (F)
C:
 D:
D:
E:
 F:
F:
Space to Move - In pictures with action, leaving empty space in front of where the viewer expects the subject to move gives a much more natural feel to the portrait. Cutting out this space makes the viewer uneasy. In the same way, leaving room in the picture in the direction that the subject is looking allows the viewer of the photograph to follow the subject's gaze. Photograph G gives Caroline space to look into, although it does not necessarily indicate what she is looking at. Photo H ends abruptly and we cannot follow her gaze.
G:
 H:
H: 
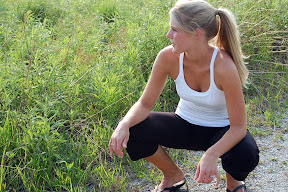
Paying Attention to Shoulders - This was a tip I picked up at Digital Photography School that I thought was really interesting. Situating shoulders in such a way that they do not appear even horizontally (I) makes for a more interesting picture. This can mean having the subject lean in toward the camera, turn so they are not square with the camera (J), or cutting one of their shoulders out of the picture (K).
I:

J:
 K:
K:
This all said, when actually shooting, it's next to impossible to keep all this in mind. Also, these 'rules' aren't really rules- a good photo can break all of them! I'm still practicing, and hope to improve so that these techniques become natural, and I don't have to keep reminding myself of them (and making the mistakes that I've pointed out in my own photos!)
See the album of these example photographs:
 |
| portrait examples |
See more portraits.
Get more portrait tips from Digital Photography School
6 comments:
Love your pics! Stephanie does really well for not knowing much. You Make it from Scratch is equally good.
what wonderful advice that I much need!! I am definitely saving and remembering this. Thanks.
Great tips! I'm always looking for ways to improve my photos. I love Digital Photography School, too!
I love your examples!
I loved the way you explained this! Great post.
Informative and well put. Thanks! I enjoyed reading.
(see in MIFS Carnival)
I never liked photography until I bought my first digital camera. Now I LOVE it, and I wish I had taken a photography class. Your blog entry was a great crash course. Thanks for sharing!
Post a Comment